Friday, December 12, 2008

Loops and Samples for Musicians - Drum Bass Kits

Sonic.Reality.Rex.Pak.Drum.and.Bass

FORMAT..: REX2

It is time for authentic European Drum and Bass. Get all the ravers on the floor with high-speed breakbeats and blistering, distorted bass lines. Mix and match beats and grooves with adjustable tempos for endless Drum and Bass combinations. This Rex Pak contains a broad range of high-energy loops created by Paul Kodish, Brian Dillman and the team of Q Up Arts and Sonic Reality.
This collection includes over 500 authentic loops in REX2 (.rex) format in the styles of progressive Drum and Bass, Jungle, IDM and more.

Contents:
- 29 Drum and Bass Construction Kits
- Over 60 Synth and Bass Lines
- Over 180 Apple Loops Beats and Percussion
- Over 250 High Energy Instruments and Effects
- Tempos: 124bpm-171bpm

Code:
More info: http://www.sonicreality.com

Code:
Download:
http://rapidshare.com/files/124806253/Sonic.Reality.Rex.Pak.Drum.and.Bass.REX2-DYNAMiCS.r00
http://rapidshare.com/files/124817783/Sonic.Reality.Rex.Pak.Drum.and.Bass.REX2-DYNAMiCS.r01
http://rapidshare.com/files/124827837/Sonic.Reality.Rex.Pak.Drum.and.Bass.REX2-DYNAMiCS.r02
http://rapidshare.com/files/124837510/Sonic.Reality.Rex.Pak.Drum.and.Bass.REX2-DYNAMiCS.r03

Wednesday, December 3, 2008

CARLOS MONTOYA - FLAMENCO GUITAR - GOLD COLLECTION


A Spanish guitarist and composer, Carlos Montoya made a lasting contribution to music between the 20s and 50s. He introduced the flamenco style of music as a serious form of guitar music. Traditionally flamenco music was used to accompany gypsy folk dancers and singers but Carlos Montoya changed it into a main genre of music. Carlos Montoya was born into a gypsy family in Spain. His interest in music and the guitar began at an early age. He began studying the guitar with his mother and a neighboring barber, eventually learning from Pepe el Barbero, a guitarist and teacher. Not only was he interested in playing the guitar, Carlos Montoya wanted to learn the history of flamenco music. Flamenco music came out of the Boorish invasion of Spain. His uncle, Ramon Montoya, was a successful flamenco guitarist also. Carlos Montoya started playing professionally at the age of 14, playing for singers and dancers at the cafes in Madrid. Two of the dancers he most often played for were La Teresina and La Argentina. Wanting to broaden his musical career, Carlos Montoya began touring in the 20s and 30s. His tours included performances in Europe, Asia and North America. He accompanied several performers including La Argentina again. He had finally made a name for himself as a flamenco guitarist. When World War II broke out in the 1940s, Carlos Montoya was on tour in the United States with dancer La Argentinita. During the war he decided to settle in New York City and eventually became a United States citizen. In 1945 La Argentinita died but Carlos Montoya toured on his own, opening his repertoire to include not only flamenco but also blues, jazz and folk music. His career took a different turn in 1948 when he began touring with symphonies and orchestras and performing his own guitar recitals. Carlos Montoya became the first flamenco guitarist to tour the world with symphonies and orchestras. His appearances did not stop there, he performed on television and gave several solo recitals. During his touring he recorded more than 40 albums, some with symphonies and orchestras. His albums include Flamenco Guitar and The Art of Flamenco. One of the most notable is Suite flamenco, a concerto he performed with the St. Louis Symphony Orchestra in 1966. Carlos Montoya made a very important contribution to flamenco music, transforming it from a dance accompaniment to a style of its own. With his own style, he adapted it to other genres of music, all along making himself an international star. Carlos Justify FullMontoya died at the age of 89 in Wainscott, NY. ~ Kim Summers, All Music Guide


Track List:

Disc: 1
Download Part1
Download Part2
Download Part3
Download Part4

Disc: 2
Download Part1
Download Part2

Download Part3
Download Part4

OR MP3 320 Kbps [330 MB]
Download Part1
Download Part2
Download Part3
Download Part4

Tuesday, December 2, 2008

Basics of MIDI

MIDI (Musical Instrument Digital Interface) is an industry-standard protocol defined in 1983 that enables electronic musical instruments, computers, and other equipment to communicate, control, and synchronize with each other. MIDI allows computers, synthesizers, MIDI controllers, sound cards, samplers and drum machines to control one another, and to exchange system data (acting as a raw data encapsulation method for sysex commands).

MIDI does not transmit an audio signal or media — it transmits "event messages" such as the pitch and intensity of musical notes to play, control signals for parameters such as volume, vibrato and panning, cues, and clock signals to set the tempo. As an electronic protocol, it is notable for its widespread adoption throughout the industry.

MIDI composition takes advantage of the MIDI interface to allow musical data files to be shared among various electronic instruments by using a standard list of commands and parameters known as General MIDI (GM). Because the music is simply data and not actually recorded wave forms, it is therefore maintained in a small file format. Several computer programs allow manipulation of the data so that composing for an entire orchestra of synthesized instrument sounds is possible. The data can be reproduced by any electronic instrument that adheres to the GM standard. There are many websites that allow downloads of popular songs as well as classical music, and there are also websites where MIDI composers can share their works.

MIDI music was much more viable back before broadband internet was available to the masses, due to its small file size. Also, the advent of high quality audio compression such as the MP3 format decreased the utility of MIDI music.

Basics of Virtual Studio Technology (VST)

Steinberg's Virtual Studio Technology (VST) is an interface for integrating software audio synthesizer and effect plugins with audio editors and hard-disk recording systems. VST and similar technologies use Digital Signal Processing to simulate traditional recording studio hardware with software. Thousands of plugins exist, both commercial and freeware, and VST is supported by a large number of audio applications. The technology can be licensed from its creator, Steinberg.

VST plugins are generally run within a Digital Audio Workstation, providing the host application with additional functionality. Most VST plugins can be classified as either instruments (VSTi) or effects, although other categories exist. VST plugins generally provide a custom GUI, displaying controls similar to the physical switches and knobs on audio hardware. Some (often older) plugins rely on the host application for their UI.

VST instruments include software emulations of well-known hardware synthesizer devices and samplers, emulating the look of the original equipment and its sonic characteristics. This enables VSTi users to use virtual versions of devices that may be otherwise difficult to obtain.

VST instruments require notes to be sent via MIDI in order to output audio, while effect plugins process audio data. MIDI messages can often also be used to control parameters of both instrument and effect plugins. Most host applications allow the audio output from one VST to be routed to the audio input of another VST (known as chaining). For example, output of a VST synthesizer can be sent to a VST reverb effect for further processing.

With appropriate hardware and drivers, such as a sound card that supports ASIO, VST plugins can be used in real-time. ASIO bypasses Windows' slower audio engine, offering much lower latency.

VST plugins:

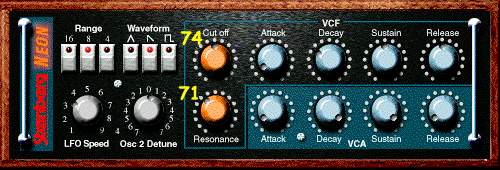
VST instruments generate audio. They are generally either virtual synthesizers or samplers. One of the first VST instruments was the Neon VSTi (see SCREENSHOT), which was included in Steinberg's Cubase. Some, such as Native Instruments' Pro-53, specifically recreate the look and sound of famous synthesizers from years past (in this case, the Prophet-5).

VST effects, such as reverb and phaser effects, process audio input. Other monitoring effects provide visual feedback of the input signal without processing the audio. Most hosts allow multiple effects to be chained.

VST MIDI effects process MIDI messages prior to routing the MIDI data to other VST instruments or hardware devices; for example, to transpose or create arpeggios.

Stay tuned for more...

Monday, December 1, 2008

Guitar Lessons for Beginners


Playing a Scale:

In order to become skillful on the guitar, we'll need to build the muscles in our hands, and learn to stretch our fingers. Scales are a good, albeit a not very exciting way to do this. Before we start, look at the diagram above to understand how fingers on the "fretting hand" (the hand that plays notes on the neck) are commonly identified. The thumb is labelled as "T", the index finger is the "first finger", the middle finger is the "second finger", and so on.

The Chromatic scale

The above diagram may look confusing... fear not, it's one of the most common methods of explaining notes on the guitar, and is actually quite easy to read. The above represents the neck of the guitar, when looked at head on. The first vertical line on the left of the diagram is the sixth string. The line to the right of that is the fifth string. And so on. The horizontal lines in the diagram represent the frets on the guitar... the space between the top horizontal line, and the one below it is the first fret. The space between that second horizontal line from the top and the one below it is the second fret. And so on. The "0" above the diagram represents the open string for the string it is positioned above. Finally, the black dots are indicators that these notes should be played.

Start by using your pick to play the open sixth string. Next, take the first finger on your fretting hand (remembering to curl it), and place it on the first fret of the sixth string. Apply a significant amount of downward pressure to the string, and strike the string with your pick.

Now, take your second finger, place it on the second fret of the guitar (you can take your first finger off), and again strike the sixth string with the pick.

Now, repeat the same process on the third fret, using your third finger. And lastly, on the fourth fret, using your fourth finger. There! You've played all the notes on the sixth string. Now, move to the fifth string... start by playing the open string, then play frets one, two, three and four.

Repeat this process for each string, altering it only on the third string. On this third string, play only up to the third fret. When you've played all the way up to the first string, fourth fret, you've completed the exercise.

Tips:

  • When playing a note, place your finger at the "top of fret" (the area of the fret farthest away from the headstock). This will produce a clearer sound.
  • Try to use alternate picking while attempting this exercise. If this is overwhelming, try using only downstrokes with your pick, but learn properly once you've gotten used to the scale.
  • Once you've finished the scale, try playing the scale backwards, by starting at the first string, fourth fret, and playing all notes in exactly the reverse order.